Wednesday, July 29, 2015

Raven: transistors in, almost done!

Wow, what a busy night for Raven.  I am ready to swap this machine out for another, and my dreams titter with what might be next.  Hopefully not another Gottlieb/Premier.  :)

it kind of looks mysterious like this.  WHAT WONDERS MIGHT IT CONTAIN?


The big thing done was taking out the driver board and replacing all the bad transistors!

So what got swapped?
Q35 was the only MPS-A13 transistor swapped, and that controlled the 1X light.
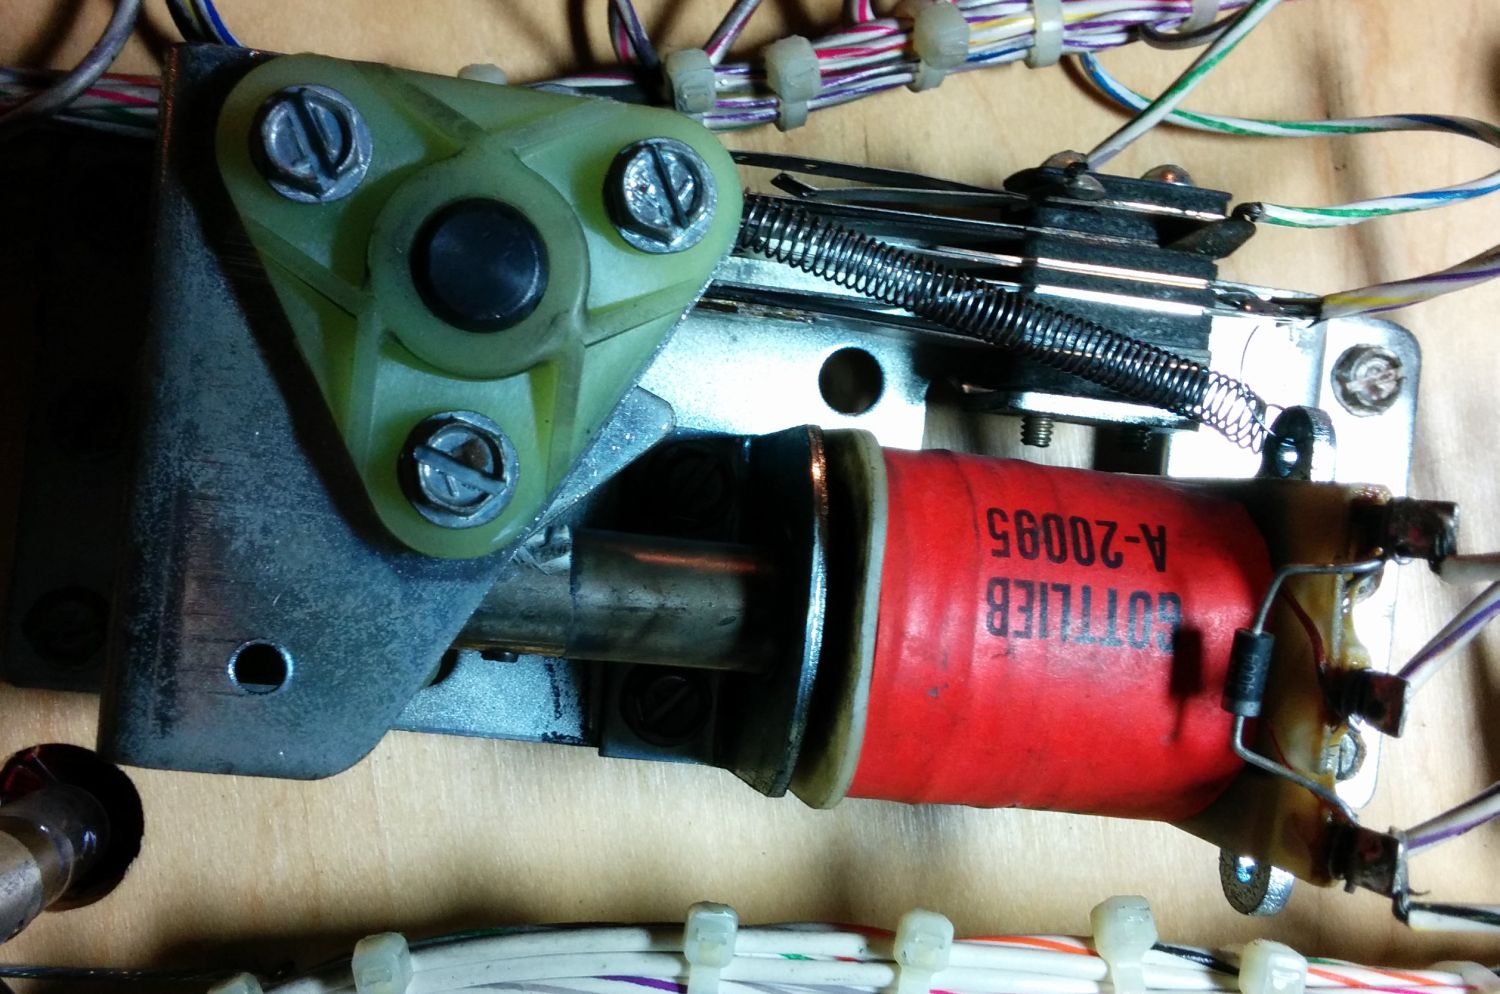
The other transistors were all MPS-U45s, which are in limited supply, and only seem to be available from Marco.  There is a somewhat similar equivalent you can get, but the legs are in the wrong spots and need to be bent.
Q22: spinner light, which was locked on, and is a VERY crucial shot.
Q25: 3000 light
Q45: #1 right spot target
Q46: #2 right spot target
Q48: right side rollover (fed from ramp)
Q52: left side rollover (fed from ramp)

well hello there, driver board.
 
After all this, 2 lights were still OUT!  But easy fix, just changed the bulbs and omg things work so much better.

(you might wonder why bother writing all of this?  Well the pinball community here is small, so chances are the next owner of this machine will be someone local, or maybe even someone I know, so whatever I can easily log here might really help the next (few) owner(s) as well.)

It becomes pretty obvious which are the old ones and which are the new ones.


Next issue was the GI.  I had found the issue with the Tilt relay, but finally gapped it properly tonight so we have some nice GI lighting.

Upper right sniper wasn't dropping:
The computer can raise or lower each of the 4 sniper drops, and if they stay up that is a gameplay annoyance, especially for this upper right one since that is the spinner shot, and you're not making it to the upper rollovers if the target has remained up.
There is a tiny coil up near the playfield that pulls in a metal disc on a fulcrum to tap the drop target off it's ledge and have it fall.  This was no where close to happening for this one target.  We tried bending the metal piece, but to no avail.  Cramped quarters, hard to get to at all, and pretty hard metal made for a bunch of zero fun.
In the end what worked was grabbing some adhevsive padding I used way back in a Rocky and Bullwinkle backbox animation repair.  Putting some on the bottom of the playfield limited the range the metal plate could rise, keeping it closer to the magnet coil, and ensuring it would get drawn in properly each time.

Ground mods?  DONE!
Ok, well most of them.  there are some further optional ones, but we connected all of the grounds at the transformer, added an extra ground to the driver board, an extra interconnect wire, and a ground for pin2 on the power supply board.

Oh and the lower right pop had gone out, blown fuse.  I replaced it and it was fine.  I inspected the hardware and was unable to see any strain, resistance, or anything that would lead me to believe it was suspect.  Wait and see on that one.

Last but not least, the fluorescent light was put back in.  The holders needed to be reattached, but in the end the light wouldn't go.  Unbeknownst to me, older fluorescents sometimes had a starter required, and the one here will need to be replaced.

So at this point, I think I just need to grab a $3 part?
Woot.

keep it classy, Raven.

Numerous fixes!

A quick summary of a few things that got fixed:

Eight Ball Deluxe had the Game Over lights stuck ON in the backglass.  HAD.
I had people over for the Pinball Women Ottawa group I run, and after a night of playing, the next day I noticed that suddenly the Game Over was behaving. 
If it was locked on, I was sure a bad transistor, and had one ready to replace it, but welp, it's working!
For all the dickheads out there that whine whine whine about women in pinball:  FUCK. YOU.
What we witnessed was the magic powers of women playing pinball:  shit just randomly fixes itself, apparently.
Take that, meninists.

Oh, and I had also re-adjusted the upper plastics above the 8-ball target.  Now with tighter alignment, shots don't fly by the Bonus Collect hole and in to the rollovers.  Very important for collecting bonus on hard shots!  It is devastating if you were shooting for that collect and the ball didn't stick in.


Corvette!
Small issue with the ball sitting on the LT5 gate and not falling in to the lock.  Expanded the hole on that new LT5 upwards ever so slightly, and now the alignment is far better and the ball rolls down appropriately.


Sinbad!
While playing the game would stall on ball reset and say to check coil 7 (thanks, Pascal board!)
But it was intermittent.  I'd check it, look for cracked solder, but all was good.  On power up, game would reset fine and you could play for a while until the error arose again.
The problem turned out to be the fuse:  It wasn't blown, but one side's metal part had cracked / come loose.  So when I raised the playfield, it shifted and connected again.  After a few solenoid bangs under the playfield, it jiggled a bit loose and caused the error.
1 new fuse solved that issue.

Sunday, July 19, 2015

Raven: flipper parts + GI lighting!

A bucket of parts finally arrived for Raven.  I restocked on 2A fuses and popped those in to the 4 pop bumper fuse holders.  I had previously but 3As in there, but that was still an improvement over the other bigger numbers.

I tore down the playfield and gave it a good cleaning, replacing a number of charred bulbs along the way.

Lots of long-neglected parts up there, let's get deeper in to it!
A bunch of the target also required adjustment:  Some had supports too far back and were being wedged under the plastics.  Some just had a terrible switch gap.
I also got to do the classic Novus 2, Novus 1, and then Carnauba Wax routine, all over.

While a new rubber kit had seemingly been installed in the past 2 years and seen minimal use, I installed new flipper rubbers because those were cold and hard.


But the most important part:   Rebuilding the right flipper.
Not much info conveyed by this picture.  For all you know, this could be from any other machine.  I'm not trying to SAY much of anything here, nope, just a nice picture relevant to the topic.  I guess it's kinda dirty?  but what can you really glean from this?  Is there a point to having it here?  Well I guess pictures do a good job of breaking up the walls of text.
Oh god, please don't take that as a slight, I didn't mean to imply you found text intimidating in any way shape or form.
Hey now, it's OK, I know you had a rough day, I had a rough day too.  It's OK, just, hey OK, just let me hold you, it'll be OK.  We'll get through this.

When I got this game, the one request the owner had was to make sure this flipper was strong enough to make that left ramp.  Well, on my first investigation, the whole EOS stack pads basically crumbled on me.
New EOS stack installed, new bushing, new coil sleeve, new spring.  Sanded slight mushrooming on the coil stop, cleaned everything.
This is probably a good time to mention that pretty much EVERYTHING under the playfield could use a good tightening?  And a tightening it got.   Maybe in another 20 years shit would start just falling of the playfield.  I recoil in horror for this possible 2035.  Partially for the shorts that might occur, partially for someone still playing Raven 41 years after it came out.


So... YAYYYYYY RAVEN IS PLAYABLE!  The right flipper is awesome and strong and the new flipper rubbers really enhance ball control.
The downside?  Raven is playable.  Uggh.
The DREAM of Raven is gone.
The IDEA of Raven was pretty awesome:  an unabashed women knockoff of Rambo!  A CHOPPER!  GREAT SOUNDS!  But unless I'm sorely mistaken, or missing the hidden "super secret rules" dip switch combo, I'm finding the game a real snooze fest.  The REALITY of Raven has gots me down.


Anyways, so I'm playing it, and I finally come to the realization:  None of the GI lights are on!
How long had it been like this?  Forever?  I think forever.
I was so wound up in the board and flipper issues, counting each of the controlled bulbs that didn't light, that I didn't even register to look in to the general illumination lights.


First up I checked voltages and connectors.
I then noticed this mysterious symbol on the schematics...
Was it a capacitor?  Was it a trimmer?  I googled schematic symbols and couldn't figure it out!
Oh the mystery!  Oh the EMBARRASSING MYSTERY of it all.

But first, let's look at what I was examining:
shoutout to my wicked photoshop skills for assembling this majestic piece of schematic data.
Start at F6: the A10P1-2 connection goes off to the coin door lights, and those were lit, verifying the circuit up to that point.
Same power connects via A12P1, pin 2, to the general illumination.  NOTE:  PLAYBOARD ILLUMINATION.  Yes, each company has their own wacky terms for all the basics.  (Remember Data East's TRIBALL?)
So it becomes obvious that it is that T that is messing us up, and the answer is pretty humiliating, but I am oh so appreciative of the vast pinball community that is willing to point out basic things to me without denigrating me at all.  They know I will do a good enough job of doing that to myself.

So yes, that was the TILT RELAY.   I didn't even think that they would, at this point game development, refer to physical relays like that.
Worse, while called a tilt relay, the only use it has on this game is turning the general illumination off and on.  Why not call it, like, "LIGHT SWITCH", "GI TOGGLE", ANYTHING other than TILT?
I get how in the older Gottlieb games, a tilt meant the lights went out, but give up the ghost, these were the cocaine fueled 80s!  Whose pride was hurt at the thought of renaming this to ANYTHING else?
Anyways, I adjust the tilt relay, conveniently located near the front of the "playboard", and now the whole thing shines.  Except when it doesn't.   Which happens.  Because it's an effect.


So what is left here?
The rest of the ground mods should get done.
Transistors need replacing on the driver board.
Upper right sniper needs an adjustment on the coil that pulls it down.
Replace it with a game I enjoy more.  :)

Corevette almost done!

Corvette is all back together and I can play it again!  weeeeeeee

So much was put in to it:
New LT5 ramp
Cliffy on the Pit hole
Cliffy on the left side of Route 66 ramp
Cliffy on the shooter lane
New bushings + sleeves for each flipper
new rubber set
new slingshot plastics
new engine wires
full LEDs
new balls

It also had a new DMD put in just before I received it, so that is all lovely too.
And one caveat is that I didn't get a new sleeve in to the right flipper, but ah well, that coil can be replaced eventually.

With the new LT5 ramp in place, a number of problems arose that required tweaking:
The rear gate would go up and wedge in that position, requiring bending and spring tweaking to ensure it didn't rise too high.
The ball sometimes would rest on the gate and not fall in to the lock!  Ack.  Adjustment to the gate required.
The balls were having trouble ejecting from the lock when more than 1 was in there...
All seem fixed now.

The most serious post-assembly problem was the machine getting confused and when Catch Me If You Can started, 2 balls were ejected in to the shooter lane.  And the machine knew this was happening, it wasn't so confused as to end your ball when one drained... 
Normal behaviour is that if you finish CMIYC, one ball should be ejected in to the shooter lane for a 2 ball multiball.
Turns out I had missed re-connecting the route 66 ramp opto.  Not sure how the game was trying to compensate, but it seemed the problem went away after reconnection.  Well, almost.  Last night when CMIYC started one extra ball was launched in to the shooter lane...
More investigation and testing required!  Consistent problems, I can deal.  Intermittent problems?  UGGGGGHH


More things done? 
Reattached the tilt bob
Fixed the operator buttons at the front
Tightened the bolts for the playfield pivots...
The end of the VUK wireform got resoldered back in to place... (I sent that one out...)

this pin was the issue for the operator buttons panel at the front.

One benefit of the new bushings + flipper rebuild was that now there is less of a bounce coming down the inlanes and hitting the flippers.  It's not perfect, but I really don't think it'll ever be perfectly smooth, AND do so while sustaining the beating that gameplay gives it.

good enough!


What's left?
Well, I guess just testing (CMIYC) and tweaking (gates around the LT5).
And of course, just PLAYING and trying to beat that high score.
(aaaaand maybe lending it out.  I've had no shortage of offers from people that want to borrow it for a while.  They are not super common in the pinball communities around here.)

Sunday, July 12, 2015

some quick work on Eight Ball Deluxe

A few things tweaked on this classic.  Still have to get around to replacing all the rubbers and doing a nice deep playfield clean though.

First up, new shooter rod spring installed...
old and sad.

new and happy!

then I swapped in warm white LEDs for much of the backglass.  The darn this is pretty much mint, and even though it changes the feel ever so slightly, it still looks great (looks better than in the photo) and will add years to its life.
SHINY AND CHROME!
WITNESS ME.

Next up was looking in to the 13 ball that wasn't lighting.  First, point of note:  There is the RACK 13 and the TARGET 13 in the manual for each ball.  TARGET refers to the bank on the right, RACK referring to the ball lights between the flippers.

For a bit I thought it might be a transistor, but it was found to be a loose wire at the connector:
This thing.  Touch it.  Jiggle it.
Lucky number 13!  Everyone's a winner!


So besides all of the plastics?  Next big thing on this will be to swap the transistor for the Game Over lights, which are always on.

sprucing up the Corvette engine!

There was one glaring aesthetic problem with my Corvette machine, besides the paint on the sides:
The engine was missing the classic wires!

When I noticed that someone had reproduced them, oh happy days!  Joy of joys!
But alas this was just the start of my frustrations all began.
Take a look at what I found:  First, many of the grommets were missing on my engine, only 3 remained in total.
Of those 3, they weren't the right size to fit the plastic!  ack.

nope, nope and uhhhhh nope.


Replacement grommets were found!  And here is a snap of the specs so you too can find them easily...

old grommets on top, new on bottom.
The old ones pushed out readily with the point of a scissor.  Old ones went in with a bit of fuss and the hard edge of a screwdriver to assist.

joy of joys!


They're in!  They're all in!  Well, almost.  The ends of the pipes IN NO WAY SHAPE OR FORM FIT IN TO THE PLASTIC HOLE.
no fucking way.
In lieu of drilling up the unobtainium engine plastic, I decided to leave it how you see it.  Not super secure, but also not likely to fall out.  It's not like anything will be hitting these, right?

ARRRRRGGGH
You know what is SO. STUPID.  ???  When the wires are there on the left, the whole thing rubs against the ramp wireform akwardly.
Look at this picture on IPDB.  That is the correct way?  So awkward.

I am going to find a way to have them secure at the upper left and right hand corners so they duck down extra low don't pull out.  But in the mean time?

fuck it.

This is how it will sit in the interim.

I know little about engines, but I do know you connect one hose opening to another hose opening, and that's how engines work.  SCIENCE, AMIRITE?
I bet my Corvette engine is now super suped compared to any others. 


Will update with the rest of repairs soon.  Can't talk, playing pinball.